
Are you ready World? In the next few years, you are going to be hearing more and more about the health benefits of the squat. Just like the barefoot movement I blogged about yesterday, the “squat movement” is going to happen in a big way, once everyone realizes that your Pelvic Floor, Hip, and Knee health require regular squatting.
If you haven’t squatted in the last million years (besides the two times you went camping and peed on your shoe), it’s going to take awhile to prepare your joints. Be patient, it’s worth it. Those of you with knee and hip replacements or other contraindications should stick to the first few “prep” exercises and avoid the weight bearing squat. Artificial equipment is not designed to have the same ranges of motion as real joints nor can some surgical repairs take the downward pressures created by straining muscles. Bummer, I know. (But to stave off surgeries of the hips and knees, etc. start this program now!)
To help you, I’ve created a step-by-step “preparing your body to squat program” you can begin right now. All you need is a yoga mat, or thick towel blanket. Let’s go!
Please Click “Next”or “Open”To Read More
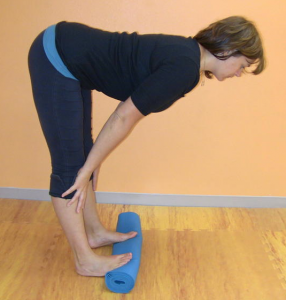
Place your one foot up on a rolled yoga mat, keeping your heel on the ground. Step forward with the opposite foot to stretch the back calf.

Now step up with both feet and try to lift you tailbone until it looks less like this picture:

And more like this one below. See the little curve at my low back? This is an indication of an un-tucked, pelvis. If your tailbone slopes down, as in the first picture, your too-tight hamstrings are preventing natural pelvic floor and glute strength from developing.

Please Click “Next”or “Open”To Read More
If you’re a chair-sitter, you should spend 5-10 minutes running through the first two exercises. They are great for preparing your joints for full flexion (bending all the way). After you’ve warmed up the back of the calves and hamstrings with a little stretching, it’s time to get down onto your hands and knees.
It is very important that your lower legs and feet track straight back, and are parallel to each other.

Now, from the hands and knee position, drop the hips back as far as you can, without allowing the feet to move closer to each other or allowing the tailbone to tuck under.

Ooops! Too far! See how the pelvis tucked in the picture below? Don’t sit back any farther if your tailbone tucks. This forces your lower back into flexion — not what we want for a pelvic-floor loading squat. Instead, come forward, re-lift your bum, and hang out in the position pictured above.

Please Click “Next”or “Open”To Read More
When your tailbone tucks, this clearly shows how TIGHT your hips have become! If you can’t sit back without tucking, it means that your hips are so stiff, they are preventing natural activity of the pelvic floor and gluteal muscle groups. Do this a few times a day until you can get back with your tailbone up.
You may also see how we are getting the body in the same position as a deeper squat without the loads. It is better to improve range of motion before you throw all your body weight onto tight joints.
Other fun squatting tips…
If your tailbone is tucking when you sit back, it means that instead of peeing (or other things) in a downward motion, you are actually doing them in a forward motion. So that’s why you pee all over your shoes. Maybe you shouldn’t joint the barefoot movement until you’ve mastered the squattingone. Just sayin’.
Now that you’ve been sitting back, it’s time to make your feet move into their squatting position. Tuck your toes under and try to get your feet perpendicular to the ground.

Spend some time stretching your feet while sitting back (aaaaand lifting your tailbone!)
Now it’s time to start bearing your body weight. The strength needed in a squat is not only getting down and lifting up, but also the strength in the lower legs to stabilize the ankles. Your lower leg muscles will usually fatigue first! To keep squats safer for your knees and hips, you should keep the alignment of the lower leg and feet. The feet should point forward, they should be placed just slightly wider than the pelvis, and the knees should not be wider or more narrow that the feet.
When you first squat, super tight quads and psoas can increase the pressure in the knees. In addition to the squat-prep exercises, give yourself additional joint space by placing the rolled yoga mat behind the knees.

Please Click “Next”or “Open”To Read More
Try to both untuck the pelvis as well as lower the heels toward the ground. Hold onto something when you first start, if you’re feeling wobbly!
Check that your feet and knees are still aligned well…

and they haven’t twisted (see how my right thigh and foot pokes out?) and your weight hasn’t shifted to favor one side. Not good for your joints.

After the ankles and lower leg have had a chance to stretch and strengthen, prop your feet up with the rolled yoga mat and gently allow your knees to bend their full range. Again, it’s very important that your lumbar spine (the concavity at the lower back) maintain its curve.
You’re ready to go camping now!

Please Click “Next”or “Open”To Read More
Don’t let this person borrow your shoes…

Eventually you will be able to maintain the curve in your low back (pelvis position,check!) and get your heels on the ground (foot health…check!). Until then, use this program as the ultimate total-leg, pelvic floor workout. Progress through these exercises as you feel comfortable, giving yourself plenty of time (which can be weeks and months even!). I also like to turn these moves into an hour-long lower body conditioning session when I’m feeling spunky.
And if you’re really bored, you can print out all of these pictures and make a flip book of me squatting. Now there’s fun for the whole family.